
Contacts
Manage your leads and clients from first inquiry to booking.
The Contacts section is where you manage all your relationships with potential and existing customers. Whether someone just filled out a form on your website or has been a loyal client for years, you’ll find them here.
Why it matters for your travel agency: A well-organized contact database helps you never miss a follow-up, track every conversation, and turn more inquiries into booked trips.
Understanding Leads and Clients
Before diving in, let’s clarify two important terms
Lead = A potential customer who has shown interest but hasn’t booked yet (ex. Someone who filled out your website form asking about a trip to Italy)
Client = A customer who has made a booking or paid for your services (ex. Someone who booked and paid for their honeymoon trip)
Viewing Your Contacts
The Contacts List
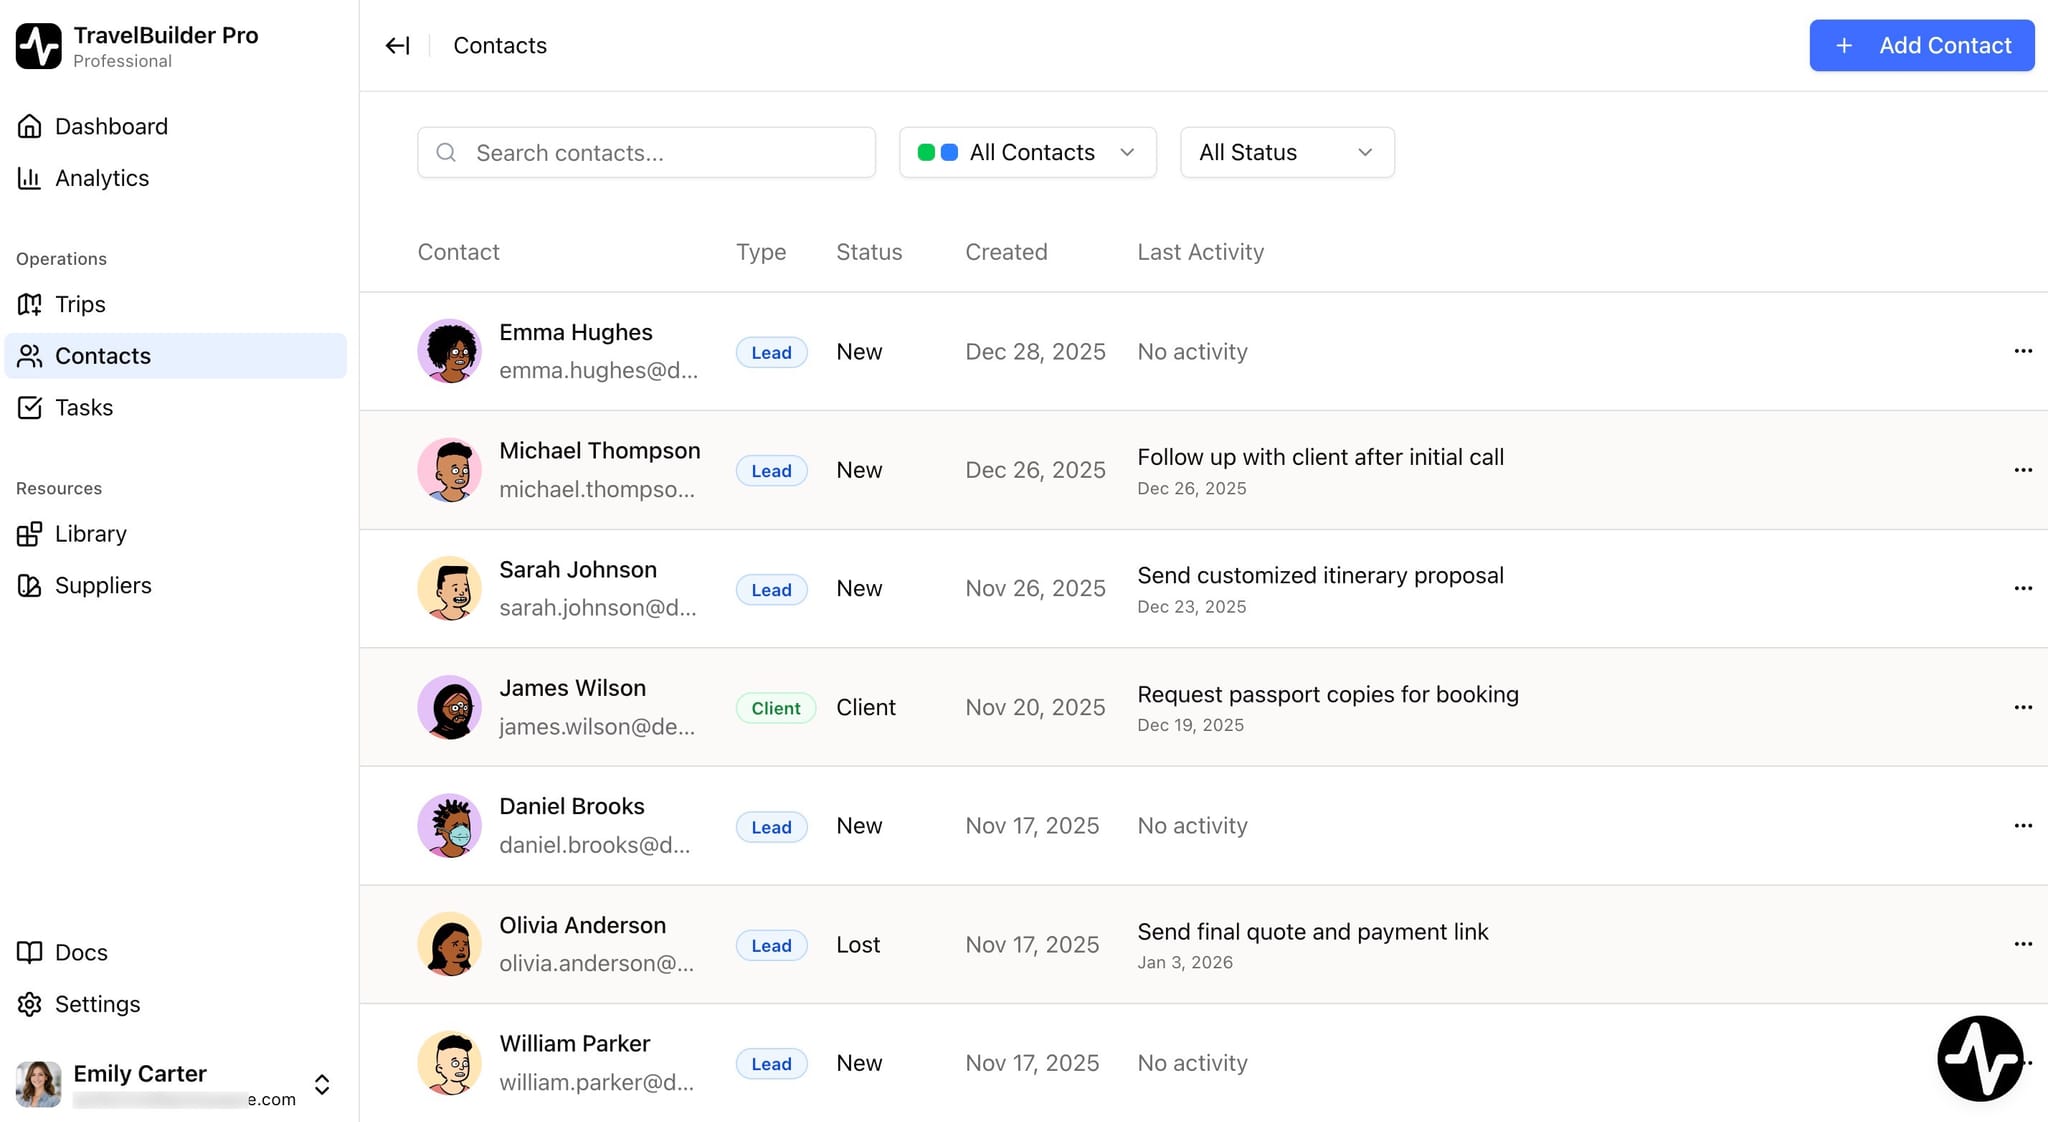
When you open the Contacts page, you’ll see a table displaying all your leads and clients in one place.
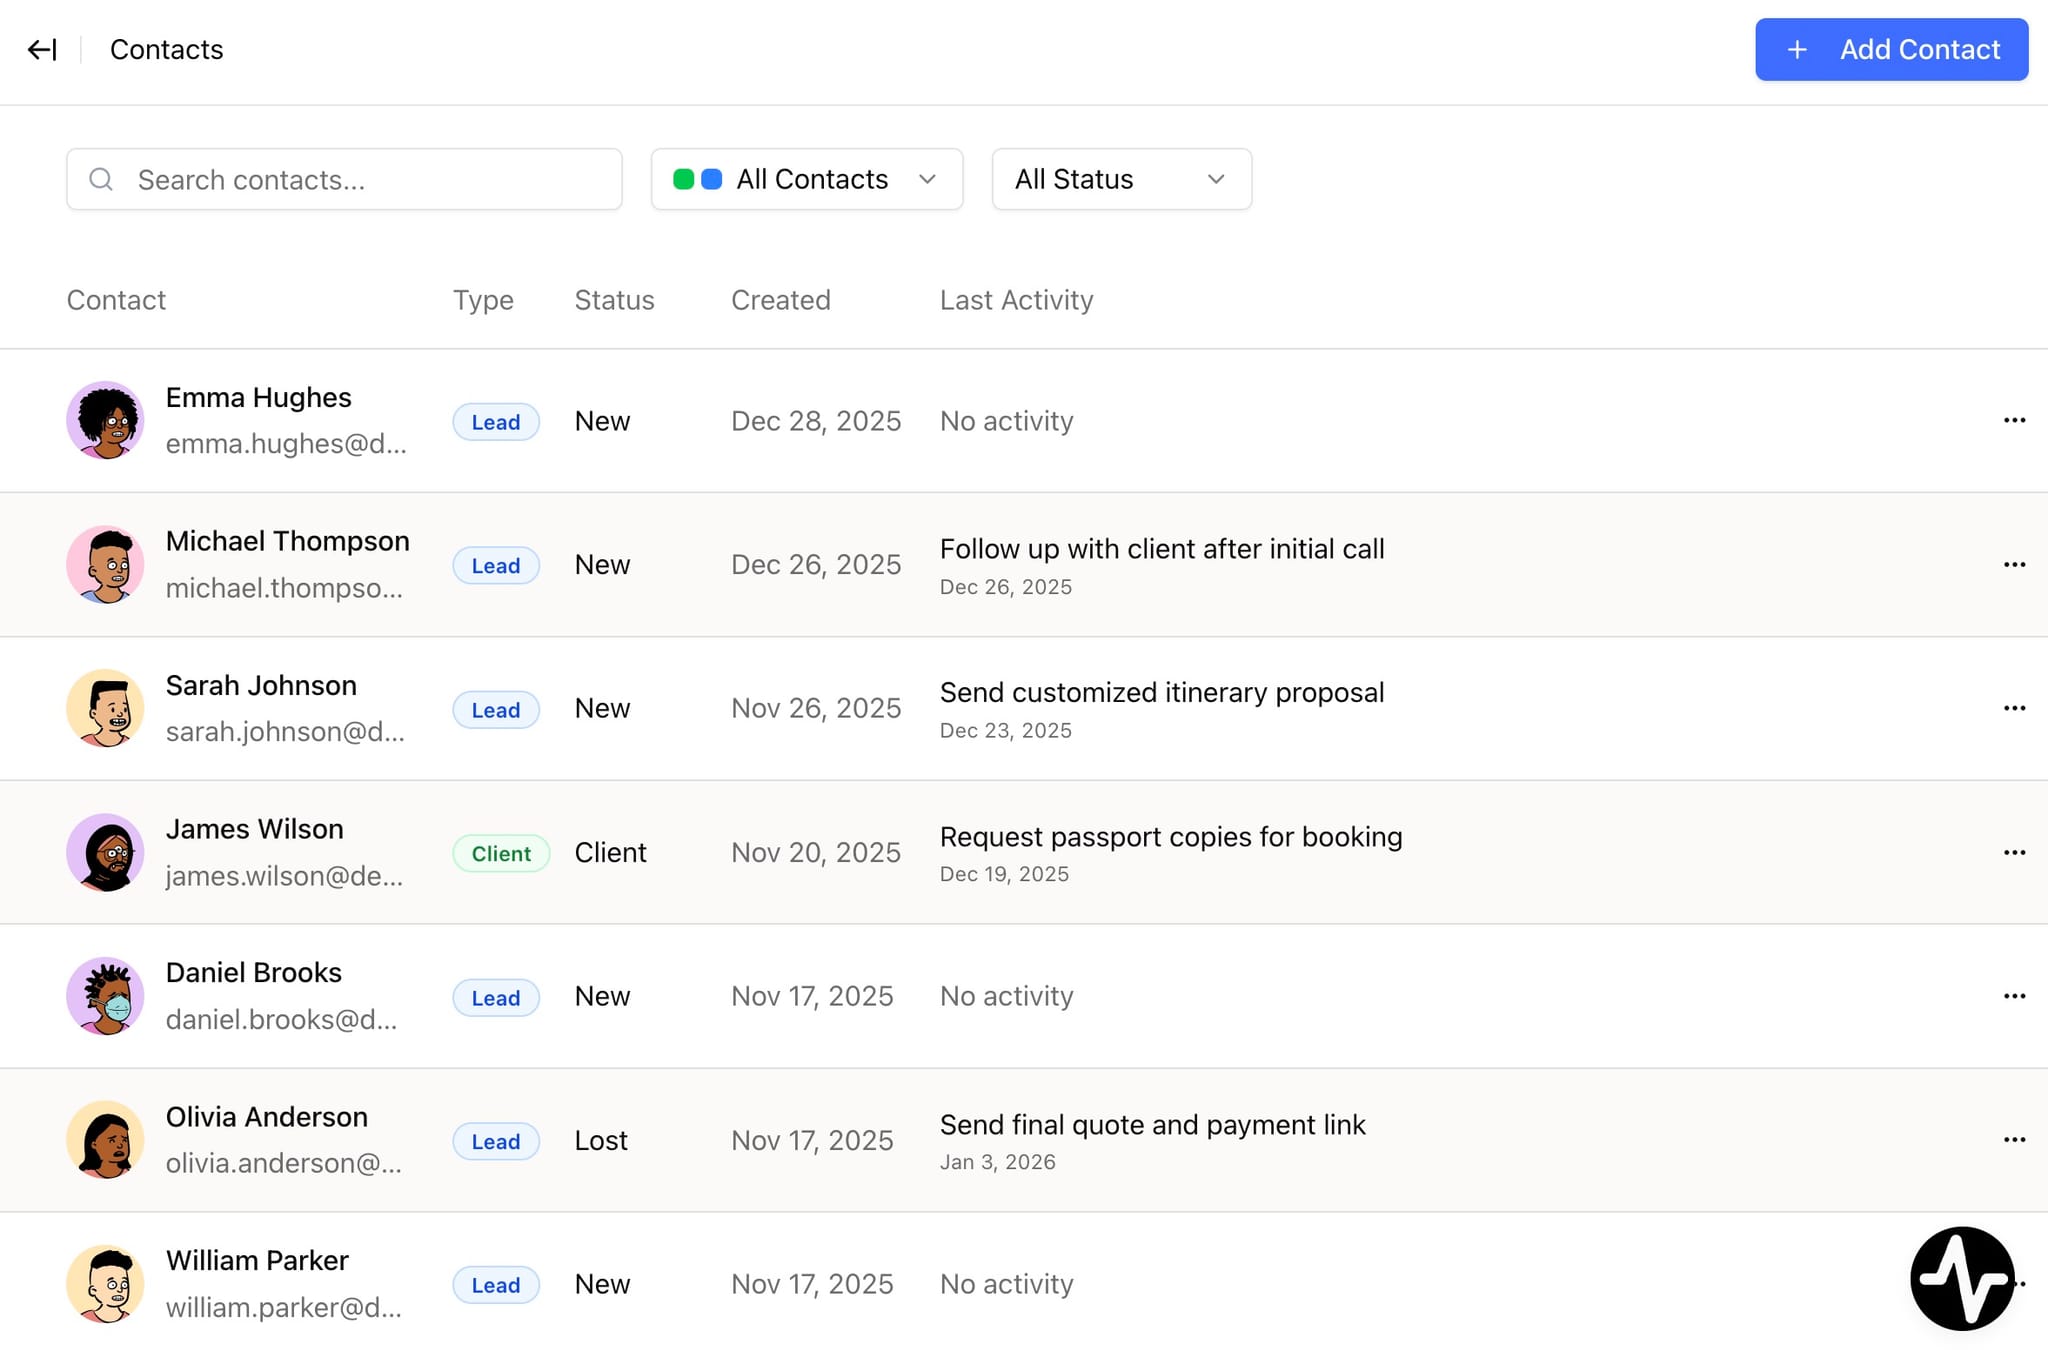
Each row shows:
-
Contact name and emailwith an auto-generated avatar Type badge— Blue forLead, Green forClientStatus— Where they are in your sales process (New,Contacted,Qualified, etc.)Created date— When they were added to your systemNotes preview— A quick glimpse of any notes you’ve addedActions menu— Quick actions like edit, convert, or create a trip
Filtering Your Contacts
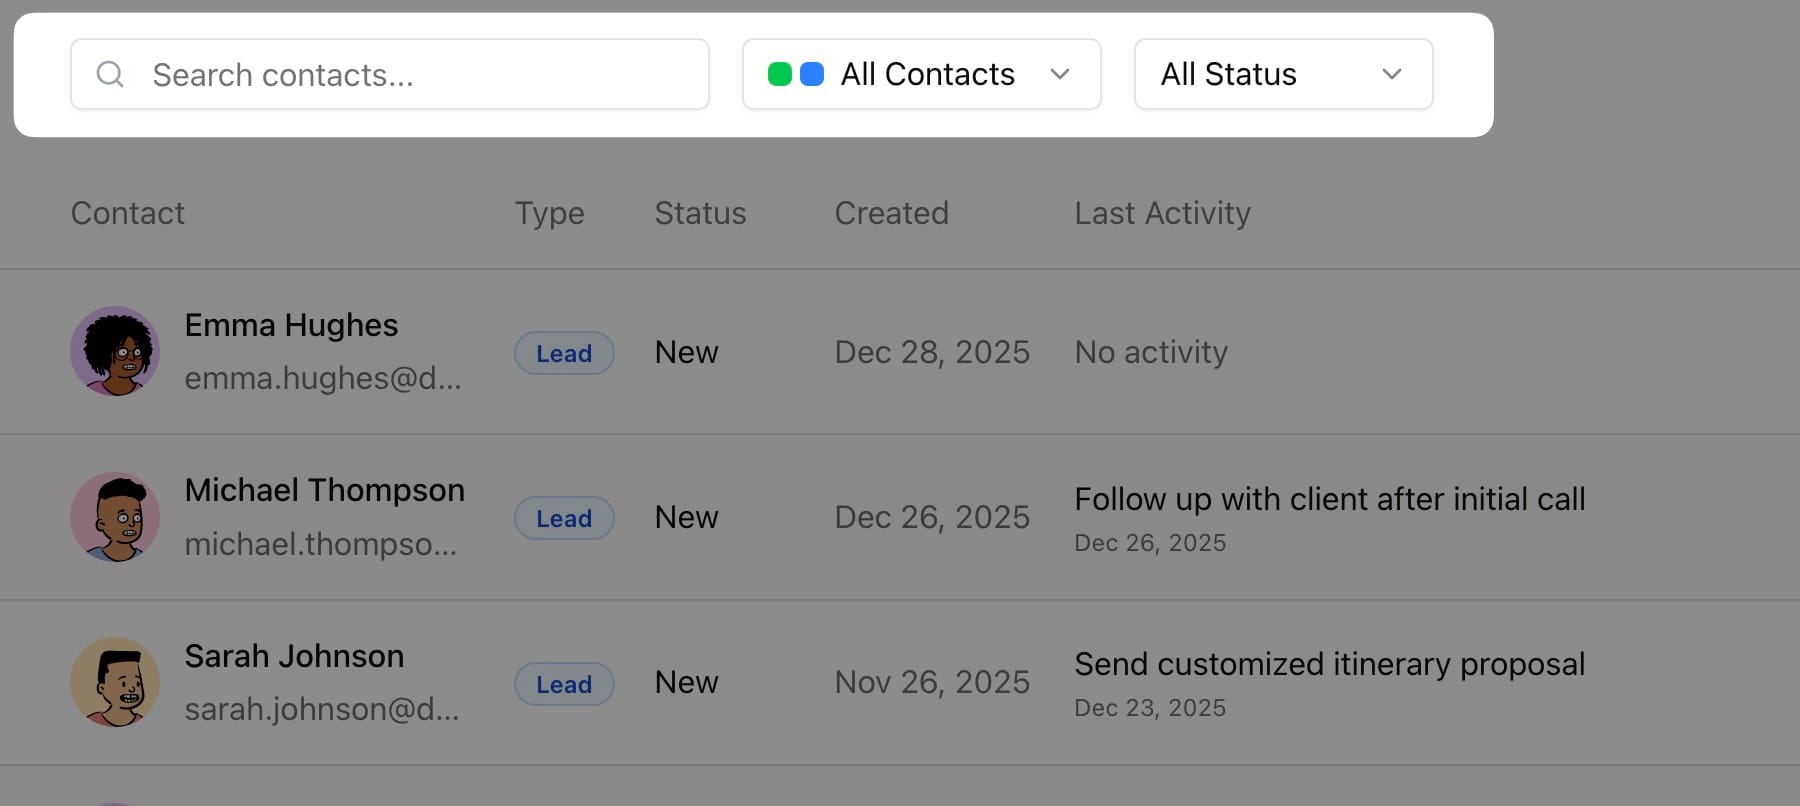
Use the filters at the top to find exactly who you’re looking for:
- Search bar — Type a name, email, or keyword to find contacts instantly
- Type filter — Show
All,Leadsonly, orClientsonly - Status filter — Filter by
New,Contacted,Qualified, orLost
Tip: Click “Reset” to clear all filters and see your complete contact list.
Bulk actions
To act on several contacts at once:
- Click
Selectin the toolbar to turn on selection mode. - Tick the checkbox on each contact you want to include, or tick the header checkbox to select every contact in the current view.
- Click
Delete selected— a confirmation dialog asks you to confirm the bulk deletion.
Use this to clean up test leads or outdated contacts in a single step.
Creating a New Contact
Method 1: Automatic via Website Forms (Recommended)
If you’ve connected your website forms to TravelBuilder Pro, contacts are created automatically when someone submits an inquiry. The system captures:
- All form fields (name, email, message, etc.)
- The form name as the source
- The submission date and time
Benefit: No manual data entry needed. Every website inquiry becomes a lead automatically.
Method 2: Quick Creation
The fastest way to add a contact is through the 3-step popup:
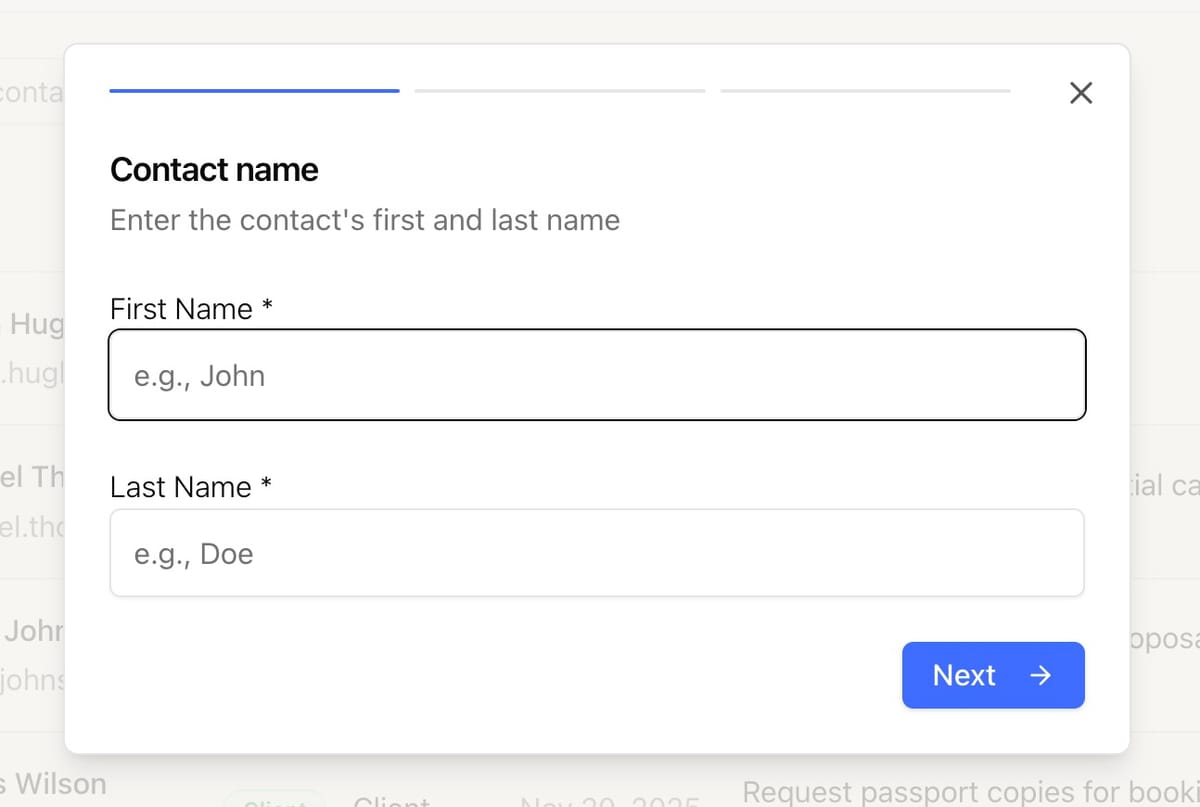
Step 1: Enter the name
- Click the
Add Contactbutton in the top-right corner - Enter the contact’s
First Name - Enter the contact’s
Last Name - Click
Next
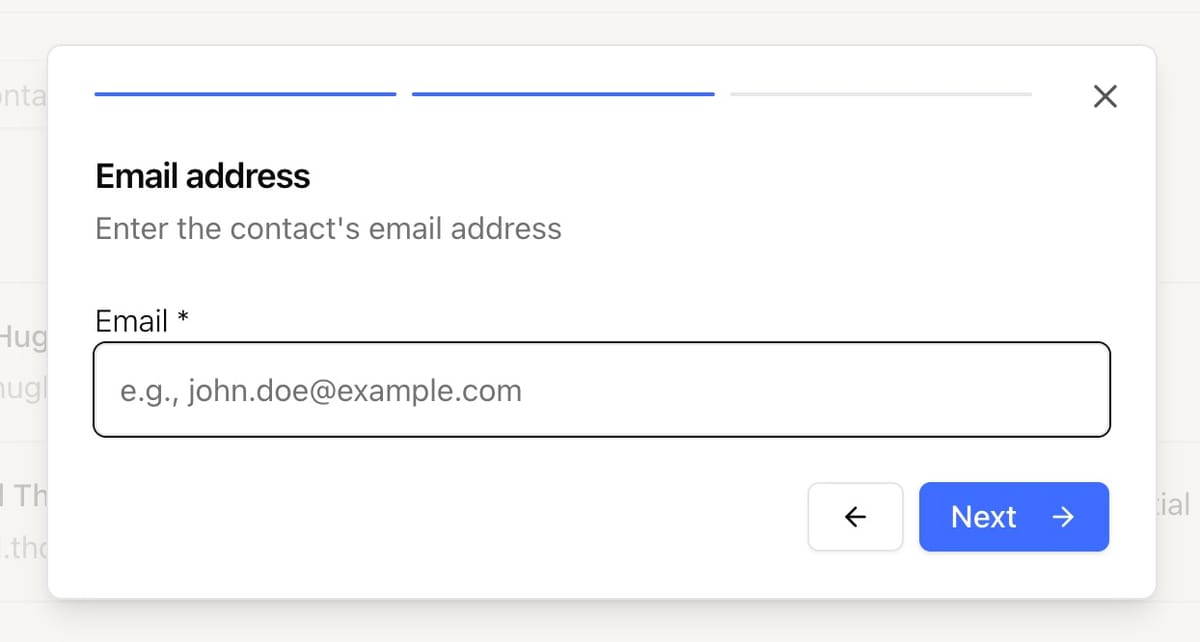
Step 2: Add their email
- Enter the contact’s
Email address - Click
Next
Step 3: Add phone number (optional)
- Select the
country prefixfrom the dropdown (search by country name) - Enter the
phone number - Click
Create Contact

The Contact Profile
Click on any contact to open their full profile. This is where you manage all their information. If the contact was created from a website form and includes an inquiry message, that message is pinned at the top of the profile for quick reference.
The overview also shows a Trips proposals counter — click it to jump straight to the Proposals tab for that contact.
Header — Pipeline Stepper
At the top of every contact profile, a pipeline stepper shows where the contact stands in your sales process: New → Contacted → Qualified → Client (with a Lost side step).
- The contact’s avatar appears on the current step so you can see progress at a glance.
- Completed steps are marked with a check badge; the current step is highlighted.
- Hover any step to preview what that status means.
- Click a step to move the contact to that status directly — no need to open a dropdown.
Header — Client Payment Card (clients only)
When the contact is a client, the header also shows a Client Payment Card summarising their overall balance across all trips:
Paid— total amount already received.Unpaid— total still outstanding.
Left Sidebar — Quick Info
The sidebar gives you instant access to essential information:
-
Avatar— Auto-generated, unique to each contact Name— With a copy button for easy sharingType badge—Lead(blue) orClient(green)Email & Phone— Each with copy buttons
Right Side — 5 Information Tabs
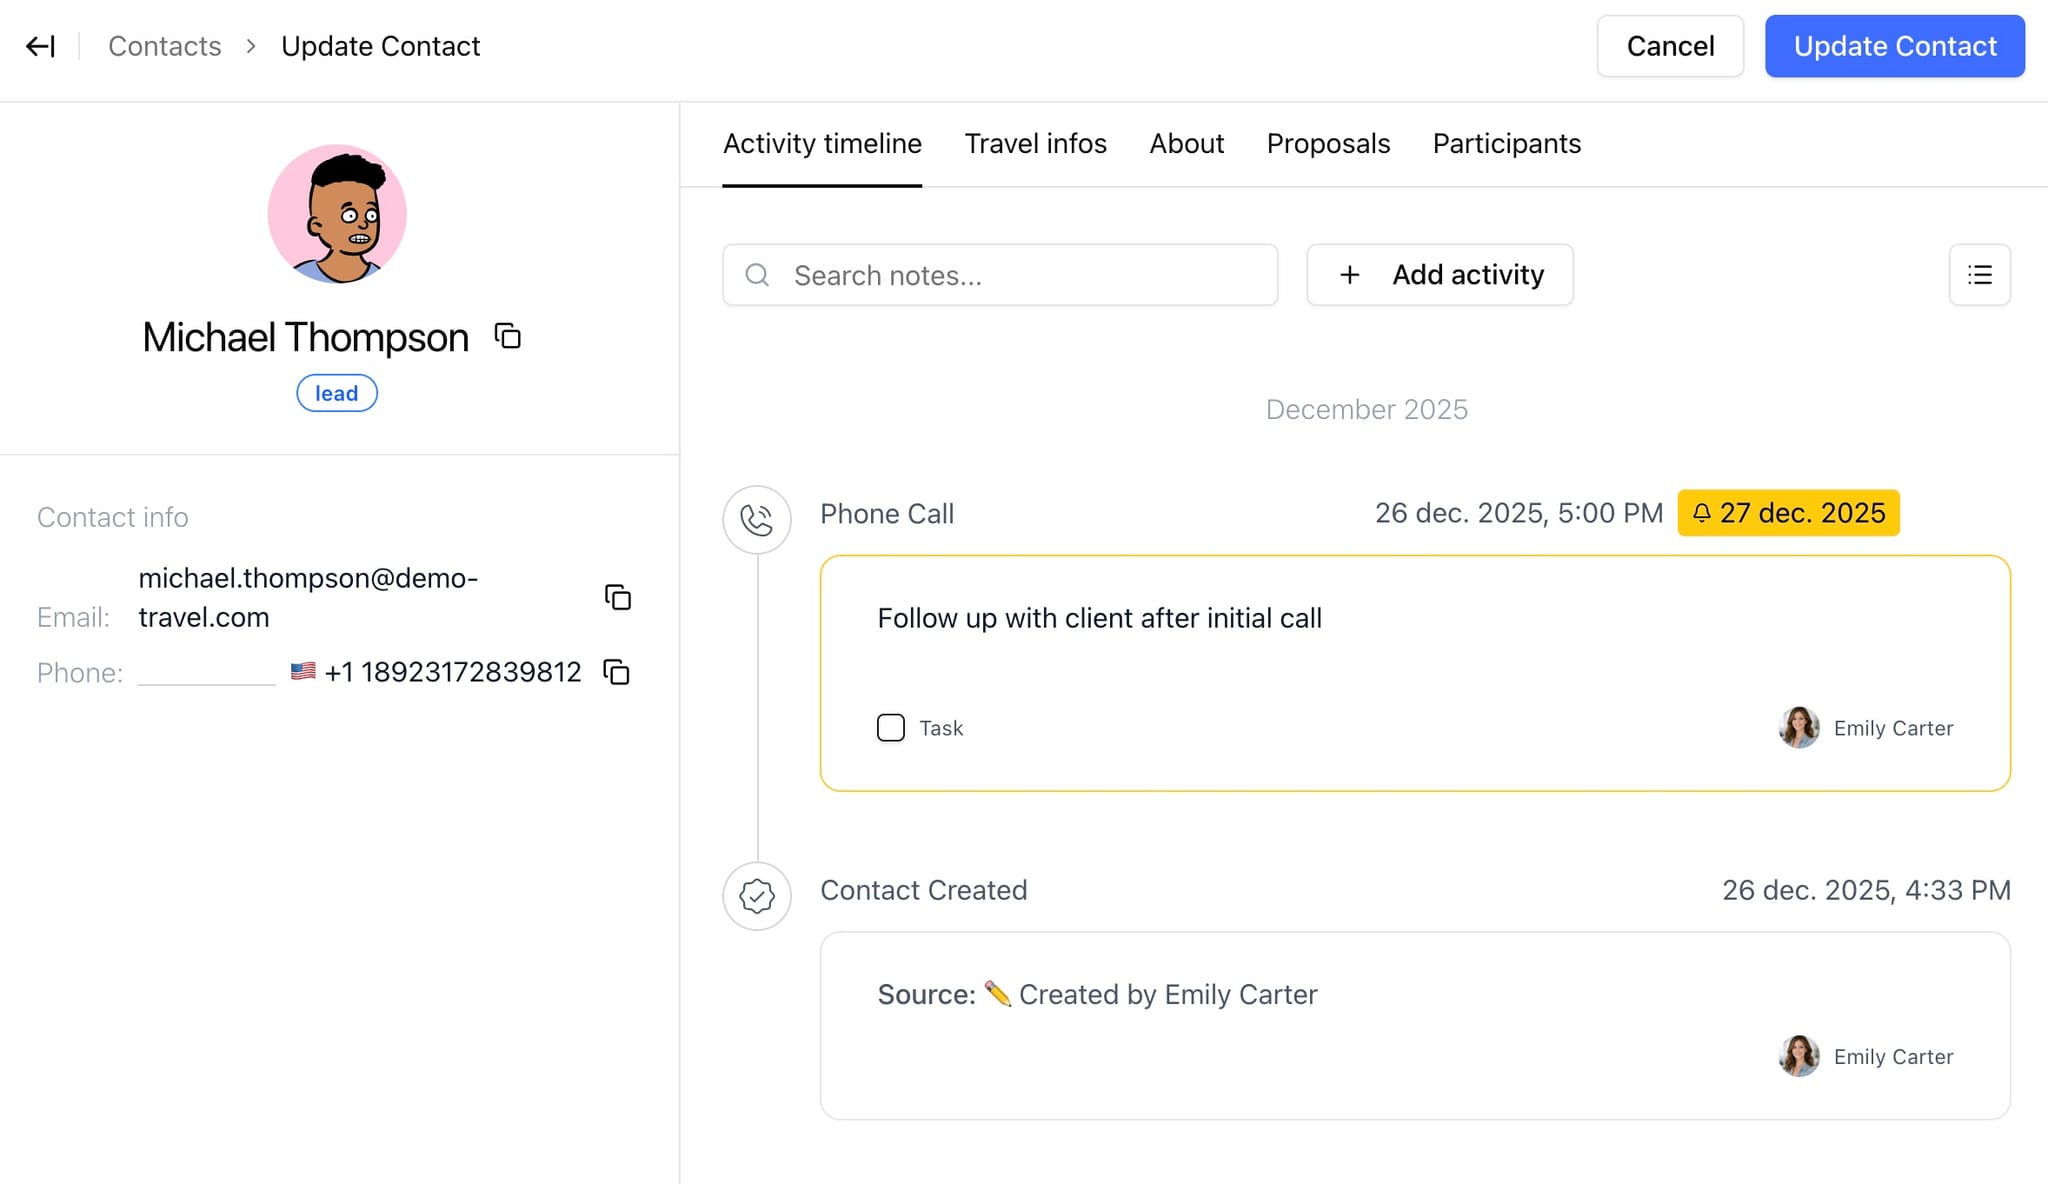
Tab 1: Activity Timeline
This is your complete history of interactions with this contact.
What you’ll see:
- Form submission data — If they came from a website form, see exactly what they submitted
- System events — Automatic tracking of when they were created, converted, etc.
- Your notes — Everything you and your team have logged
What you can do:
- Add a new activity — Click
Add activityto log a call, email, meeting, or note - Create tasks — Add reminders that appear in your Tasks page
- Search notes — Use the search bar to find specific information
- Toggle views — Switch between detailed and compact view
Tab 2: Travel Infos
Capture what your contact is looking for in their trip.
Fields include:
-
Trip Message— Their original inquiry or request Destination— Where they want to goTravel date— Their desired departure dateBudget— Indicative budget for the tripProject Stage—Research,Planning, orReady to BookTravel Participants—Solo,Couple,Family,GroupTrip Type—Leisure,Adventure,Cultural, etc.Accommodation preferences— Type, category, and special notes
Why this matters: Having trip preferences on file helps you create perfectly tailored proposals faster.
Tab 3: About
All personal and contact information lives here.
Organized into 5 sections:
-
Personal Information— Name, birthday Contact Information— Email, phone (with a WhatsApp toggle next to the phone input to mark whether the number is reachable on WhatsApp)Key Travel Information— Passport details for bookingsPreferences— Allergies, dietary needsAddress— Full mailing address
Tab 4: Proposals
View and manage all trip proposals for this contact.
Features:
- See all trips created for this contact
- View payment status (
Paid,Partial,Unpaid) - Check trip status (
Draft,Sent, etc.) Create a new tripdirectly from here with one click
Tab 5: Participants
Manage every traveler going on a trip with this contact. The contact themselves is the primary participant; click Add participant to add co-travelers as sub-tabs, each with their own form for personal, contact, travel, and preference details. This is where you capture passport numbers, dietary needs, room preferences, and birthdays for the whole booking party.
Converting a Lead to a Client
When a lead commits to a trip, it’s time to convert them to a client. This is a milestone worth celebrating — and TravelBuilder Pro even fires a little confetti animation to mark the moment. 🎉
Option 1: From the Contacts List
- Find the lead in your contacts list
- Click the three-dot menu (⋮) on their row
- Select
Convert to Client - Done! A success message confirms the conversion
Option 2: From the Contact Profile
- Open the contact’s profile
- Go to the
Participantstab - Change the
Typedropdown fromLeadtoClient - Confirm in the popup dialog
- Click
Yes, Convert to Client
What happens when you convert:
- The contact badge changes from blue (
Lead) to green (Client) - The conversion date is recorded automatically
- A
Converted to Clientevent appears in their timeline - Your analytics will show how many days it took to convert
Good to know: You can also revert a client back to a lead if needed. The history is always preserved.
Adding Notes and Tasks
Keep your team informed by logging every interaction
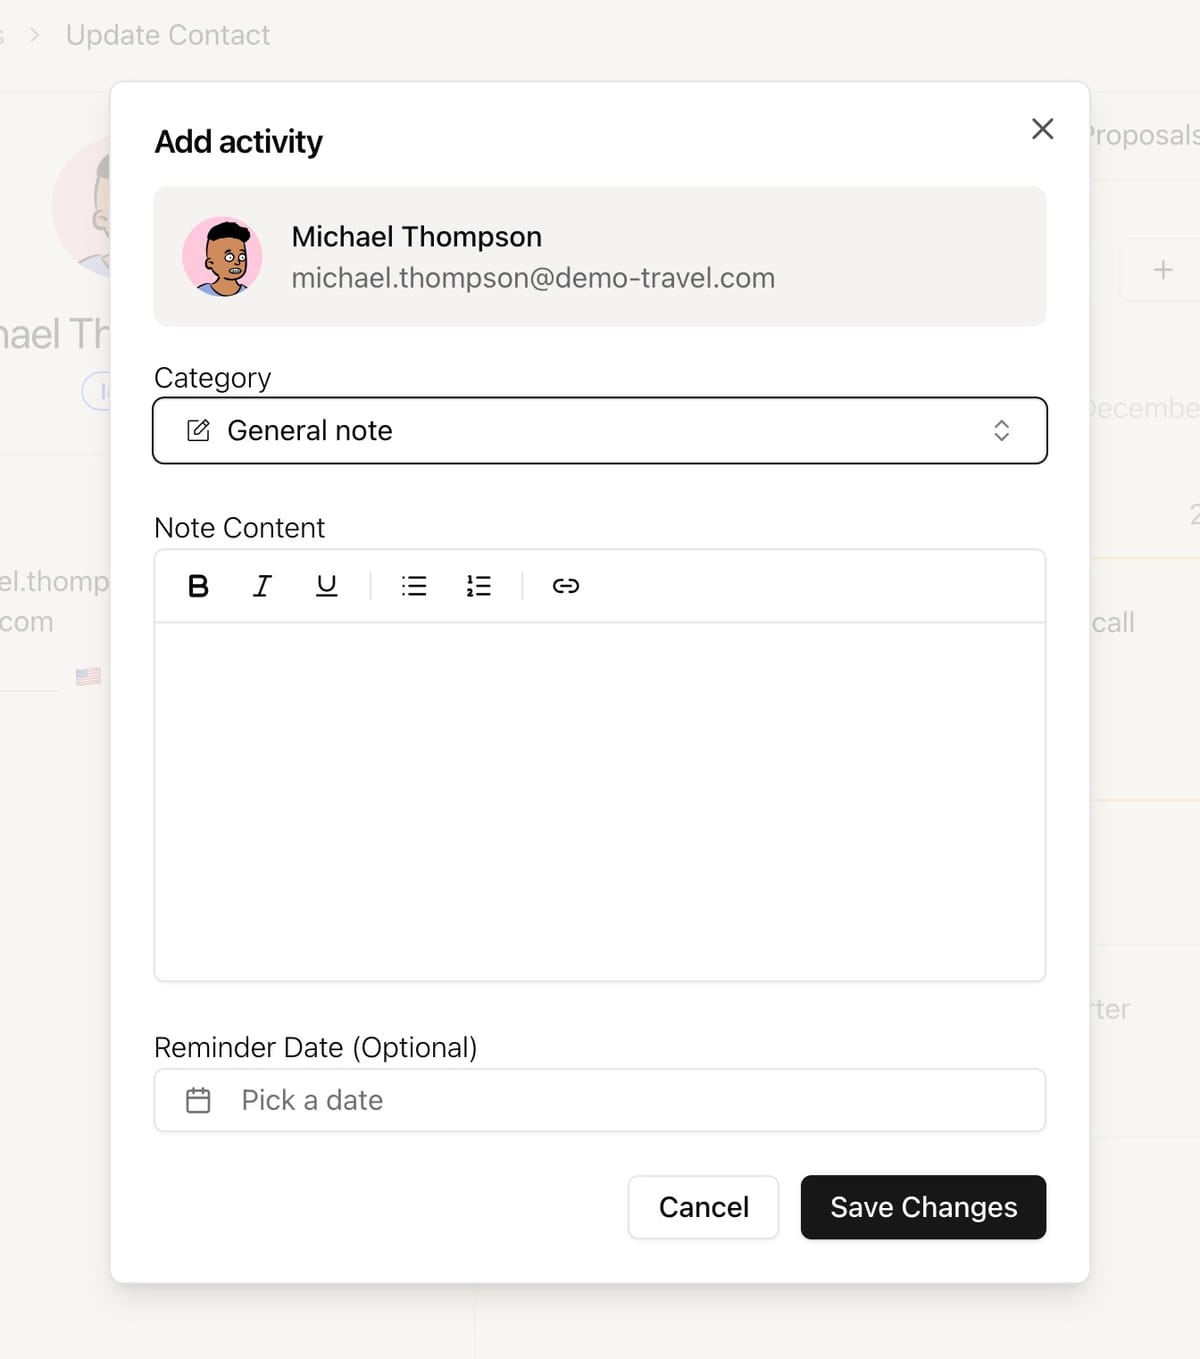
Adding an Activity
- Open a contact’s profile
- Go to the
Activity Timelinetab - Click
Add activity - Select a
category(what type of interaction was it?) - Write your
note content - Optionally, set a
reminder dateto turn it into a task - Click
Save
Available Categories
-
📞 Phone Call- Logging calls you made or received ✉️ Email- Recording email exchanges💬 WhatsApp- WhatsApp conversations👥 In Person- Face-to-face meetings🔗 Social Media-Interactions on social platforms✅ Qualified Lead- Marking a lead as qualified🤝 In Negotiation- Active deal discussions❌ Lost- Recording lost opportunities⏰ Follow-up Scheduled- Planned follow-ups📝 General Note- Any other observations⚠️ Important Information- Critical details to remember✨ Client Preference- Preferences and special requests
Creating Tasks with Reminders
To create a task instead of a simple note:
- Follow the steps to add an activity
- Set a
Reminder dateusing the calendar picker - Optionally, check
Set specific timeand choose a time - Save
The note becomes a task that will appear in your Tasks page with the reminder date.
Managing Notes
- Edit a note: Hover over your note and click the pencil icon (only available for notes you created)
- Delete a note: Hover and click the trash icon (only your own notes)
- Complete a task: Click the checkbox on any task (anyone on your team can do this)